
This Collections Care document has been produced using information from our Conservation Development Officer, Helena, to provide suggested step by step methods to treat woodworm.
If you aren’t sure how to identify woodworm, then keep reading…
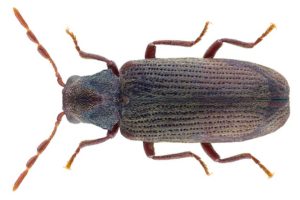
If, on the other hand, you know this critter on the left is boring away in your collections then download our resource which gives you a step by step guide to treat woodworm.
It’s smaller than a grain of rice, and a dusty chocolate brown. Seen up close it has rows of tiny dots along its back and it looks as though it’s wearing a rather large cycle helmet. It might sound innocuous, but it has the power to arouse fear in the most stalwart of museum folk. It’s Anobium punctatum, the furniture beetle, often called woodworm.
Most of the time the young woodworm grub, like a small white caterpillar, is munching its way through the wood of some prized museum object or even the timbers of the building itself, but from late spring onwards the adults emerge, chewing small holes about 2mm in diameter and look for mates.
If the museum store is undisturbed, especially if the relatively humidity is a bit high, you may find them crawling around on the surface of objects when you first put the lights on. Sometimes you will find the adults caught in sticky blunder traps or dead on windowsills. Sadly, by then they may have already mated and laid eggs in the holes in the object. Soon the tiny grubs will hatch and crawl deeper into the wood, tunneling their way around, always staying below the surface, for as long as 5 years before they pupate and emerge as adult beetles.
So, what do you need to do? If you find holes in your wooden, basketry or wickerwork objects don’t panic, but do investigate further:
- Are the holes fresh and bright looking inside or dull and dark? New exit holes will be clean and bright and need action.
- Is there grainy wood dust falling out of the holes or in little piles beneath the object? The dust or frass (droppings) can fall out of old holes when the object is moved. If the holes and dust look bright or there are little piles, then the infestation is recent and needs action.
- Are there little dark brown beetles in the area (dead or alive)? Then you need to take action.
Treatment of Active Woodworm
This guidance is for treating wooden items (including those which may also contain a small
amount of metal or leather). It is not suitable for items containing ivory, glass or other materials
(If they do, then isolate them as described in Step 5 below and check with a conservator before
treating.)
Signs of active woodworm:
• Fresh looking holes (light colour inside)
• Beetles or fresh frass (insect droppings)
Materials you will need:
• Camera (photograph and document each stage thoroughly)
• Acid-free tissue
• Ziplock bags
• Paper and pencil for labelling
• Polythene sheeting (if your object is too big for the ziplock bags)
• Plastic parcel tape
• Acid-free tissue
• Suitable protective clothing including gloves and goggles
• Disposal bag
• Vacuum with a HEPA filter (always empty after use)
• Access to a freezer (to store the affected items for at least a week)
• Tweezers
• Soft artist’s paintbrush
Method:
1. Prepare a suitable work area with layers of acid-free tissue on the work-surface so you can
see and capture any loose fragments or insects.
2. Assemble all the tools and materials. Put on your protective clothing.
3. In your workspace and storage area, get everything up off the floor and vacuum, including
vacuuming all shelves. Often woodworm beetles emerge from the underside of wooden
crates and live between the object and the floor, so examine the underside of any wood or
card boxes and vacuum.
4. Assess your objects. Isolate any wood that looks as though it has fresh woodworm holes. Plan to treat these items as soon as possible, but aim for before March/April when adult worms may emerge.
5. Put the contaminated wood in ziplock bags or polythene, write and insert the paper label and form an airtight seal. If it has metal parts or might be damp, place it on a pad of acid-free tissue in the bag to help buffer changes of moisture and prevent condensation. Delicate or decorated items should be wrapped in acid-free tissue before sealing in the bag.
6. Place the sealed object in a freezer until you are sure it is frozen all the way through. This can take a week. If the freezer is a commercial one and reaches -26’C consistently you only need to freeze it once. If it is a domestic freezer, and only reaches -20’C you need to freeze it for at least a week, gently lift it out (remember the object may be very brittle while frozen, so support it on a tray or card if it is fragile).
7. Let the object thaw, still sealed, for a week and then freeze it again for at least a further week. This will kill the adults and larvae on the first freeze, trigger the eggs to start developing and kill them on the second freeze.
8. After freezing is complete, allow the object to defrost for several days before opening the package. Do not open the polythene until the item has finished thawing right through. Only open the package when you have a clean area to put the object back in. Gently examine the object, picking off any insects or debris with the tweezers and the paintbrush.
Download the below resource for step by step guidance to treat woodworm