
WHY DO WE MARK OR LABEL OBJECTS?
Every item in a museum collection should always have its identity number with it. This is an effective method of identification which enables the object to be securely linked to the information the museum holds about it. If this bond between the object and its documentation is broken, the consequences may be serious. It may take considerable time and effort to re-identify the object securely. If the object cannot be confidently re-identified, the reason for keeping it may be lost.
Marking and labelling are part of the SPECTRUM procedures for caring for collections and are required as the minimum standard for museum accreditation in the UK.
An object is given an Accession Number when it is accepted into the museum’s collection. If it has been loaned to the museum it may be given a Loan Number. If it is temporarily without a number (for example because it has been handed in to the museum for examination to see if the museum wishes to keep it, or because it has been found in the museum with no identification) it may be given a Temporary Number. Once it has been accepted into the collection, or has been correctly identified, its Temporary Number is replaced by its Accession Number. A list should be kept showing the link between all Temporary Numbers and Accession Numbers (or stating that the object has been handed back, so the Temporary Number is no longer in use). The list of Loan Numbers should show when the object arrived at the museum and when it left.
Marking means writing the Accession Number directly onto the object, or permanently attaching it (e.g. with an adhesive). Labelling means writing or printing the number on a separate card, label or tag and attaching it securely but not permanently (e.g. by tying it on with cotton tape).
The method of marking or labelling should be carefully considered for each object or group of objects. Inappropriate marking techniques can cause irreversible damage. The mark or label should be as permanent as possible but be easily removable, if necessary, without causing damage to the object.
It is vital that the mark or label is legible, clear and cannot easily be misread. The size and shape of the letters and numbers must be carefully chosen. A full description and photograph of the object should also be included in the documentation.
Marking an object is not intended to act as a security device in the case of theft of the object.
Designing the Accession Number
Museums use a variety of different numbering systems. As long as your museum is consistent in the way it numbers objects and there is no risk of duplicating numbers (of giving the same number to two or more different objects), it is not essential to use the recommended system. The MDA recommended code is to use the year of accession as a four digit number, followed by a dot and then the number entered into the collection register that year (e.g. 2012.1, 2012.2, 2012.3) Strokes / are not used to separate numbers as they are easily mistaken for the number one – I. Objects which have detachable parts (e.g. a teapot with a lid, a box with contents) or parts of a set (e.g. a tea set, a pair of shoes) are given sub-numbers (e.g. 2012.1.1, 2012.1.2,
2012.1.3) It is vital that the number is written clearly and cannot be easily mistaken. A hurriedly written B can easily be mistaken for an 8, an S for a 5. 1 and 7 can be very similar.
Using the museum’s MDA Code
Every museum in the UK has a Museum Documentation Association (MDA) 5 letter code. The first three letters usually identify the place (e.g. BAT for Bath, BRI for Bristol) and the last two identify the museum (e.g. BATRM for Bath’s Roman Museum, NTTRE for National Trust: Trerice). The list of current codes can be seen at http://collectionstrust.org.uk/mdacodes/ . If your museum is not listed you can contact the MDA via this site and ask for one. This way you can be sure your code has not been duplicated by another museum. You do not have to write this code on every item in the museum’s collection. However, when objects from your museum leave the building (e.g. on loan to another museum) it is good practice for the MDA code to be attached to the object. In some cases this has enabled museums to identify and reclaim missing objects years later.
WHEN TO MARK OR LABEL AN OBJECT
Marking or labelling an object should be done as part of the accessioning process. Items which are on loan to your museum or not yet accepted into the collection should NOT be marked. In this case, a temporary label (with its Loan Number or Temporary Number) should be tied onto the object in case it becomes separated from its entry form.
An accessioned object should be physically marked; however in some cases this may not be possible (e.g. coins may be too small to mark). These guidelines should help to ensure that items are labelled or marked in ways which are:
- Secure – It must be difficult for the label or mark to be accidentally
- Reversible – It should be possible for a label or mark to be removed intentionally from an object, even after 100 years, with as little damage as possible
- Safe for the object – Neither the materials applied to the object nor the method by which they are applied should risk significant damage to the object
- Discreet but visible – The mark or label should not spoil the appearance of the object, nor obscure important detail. However, the number should be visible enough to reduce the need to handle the
- Convenient and safe for staff and volunteers – Materials should be easily available in small quantities and should not pose significant risks to health if used in accordance with the guidelines recommended by the Health and Safety Executive Control of Substances Hazardous to Health (COSHH) and risk assessments.
Renumbering
Changing the number which has already been written on an object is very serious. You should only do this if:
- The number is definitely wrong
- Two objects have been given the same number
- It is safe to do so
- The number is illegible
You must keep a record of the change- make a note on the object’s record.
HEALTH AND SAFETY
Before deciding on a marking or labelling technique, the health and safety risks associated with it should be considered and relevant documentation consulted. Under the COSHH legislation, it is the responsibility of each museum to carry out a risk assessment, and to develop internal guidelines to ensure safe working practices.
As with any work involving the use of potentially hazardous substances, it is important to make sure that
- People wash their hands before and after a labelling and marking session
- There is good ventilation
- Any waste (e.g. swabs with solvent) is safely disposed of
- Equipment is kept clean and in good condition
- Suitable protective equipment is worn
- Materials are stored and used safely
- The work area is well away from food, drink, smoking, flames or hot tools
- People know the first aid procedures in the museum
Please take care when using acetone and white spirit, which are highly flammable solvents. Repeated contact with the skin can cause skin irritation or even dermatitis. Inhaling high concentrations of white spirit fumes repeatedly can lead to symptoms of central nervous system depression including slowed reactions and lack of co- ordination. Always work in a well-ventilated space and keep the top on the bottle when not in use.
MATERIALS TO AVOID
Only use the correct, archival quality materials. In the past inappropriate materials have been tried which cause a variety of problems and should never be used on museum objects. Here are a few examples:
- White correcting fluids (e.g. Tipp-ExTM) dry to form an inflexible surface layer which easily cracks and falls off. They are not designed for long-term stability and may discolour and deteriorate with age. If they come into direct contact with the surface of an object, they can be extremely difficult to remove and leave an unsightly white residue.
- Clear nail varnishes are made from a variety of materials including cellulose nitrate. They are not designed for long-term stability, and their ageing properties are untested. They are likely to cross-link with age, becoming brittle, discoloured and difficult to read through. They may become insoluble and hard to remove without damaging the
- Nail varnish remover is not pure acetone. It may be mixed with other solvents including ethyl or amyl acetates and contain other ingredients, such as perfume and oils. It may cause staining to object
- Other substances that should never be used on an object include self-adhesive tape or sticky labels, Blu-tac, Velcro, felt-tip pen, pins, steel paperclips. Do NOT apply any self-adhesive label or tape, such as SellotapeTM, to the surface of an object. If a glued-on label is the most appropriate technique, use the Paraloid B72 acrylic solution in acetone as adhesive. Some objects should have a label attached with a starch-based adhesive (such as botanical specimens) – ask a conservator for a suitable
Any chemical substance, unless it has been developed or tested within the museum profession so that its properties are known, may have adverse effects on museum objects. Always check with a conservator before using.
POSITION OF LABELS OR MARKS
A table of recommended or standard positions is given below, but each object should be examined to make sure that the position where the label or mark is placed is suitable.
- Avoid physically unstable surfaces, weak areas or places where there are cracks or
- Avoid areas which are decorated, painted, varnished, pigmented or
- Choose a position so that the number is unlikely to be visible when the object is on display, e.g. the underside or reverse
- Avoid surfaces where the mark is likely to be at risk from abrasion, such as surfaces on which the object normally rests, or where it is touched during handling
- Position the number so it can be found easily, to minimise the handling necessary to read it. (Where possible, packaging should also be marked with the object numbers and /or additional archival labels )
- Whenever possible use standardised positions for particular types of object. Special collections may have particular recommendations. Keep a record of the standard positions used in your museum and consult it
- Mark all detachable parts of an object (using suffixes to the Accession Number – e.g. 005.3)
- With composite objects (made from different materials), mark the part on which the most secure method can be
- Where duplicate pencil marks are made these should be in different positions on the object (bearing in mind, of course, the other principles listed above).
Before handling objects, please read your museum’s Handling Guidelines and any relevant Risk Assessments, prepare the area, yourself and everything you need.
CHOOSING A MARKING OR LABELLING TECHNIQUE
There are a number of techniques which can be used to mark or label an object with its accession number. For example
- Ink on a lacquer base coat, with a protective lacquer topcoat – Paraloid B72 + black/white pen + Paraloid B72 or Paraloid B67
- Printed label
- Sewn on label
- Tie on label
- Marking with a 2B pencil
- Special labels, e.g. for small objects
- Labelling wet objects
- Pinned label for biological specimens
- Some alternatives for larger objects
Generally particular techniques are used on particular materials, e.g. glass and flint should be marked using the ink and lacquer method, whereas textiles should have a label tied or sewn on.
Each object should be considered individually, based on simple questions such as:
- What materials is the object made of?
- Is the surface porous? (e.g. low-fired ceramics, limestone, leather, bone)
- What is the condition of the object surface? Is it flaking or powdery? Is there a special finish such as a varnish?
- Is the object physically strong enough to apply a number or attach a label?
- Is the surface rough or smooth? Will the number be legible?
- Is the object large enough to apply a legible number?
The table below lists the main types of objects and materials, suitable techniques and positions.
If you are uncertain, or are worried about an object, please STOP and ask a conservator.
Preparation
Prepare the area:
Have a clean clear space where the objects will be safe and secure
Make sure people can see that objects are being handled there and do not put inappropriate items near them
Make sure there is no food, drink or items which could stain or damage the objects nearby
Cover the work surface with sheets of acid free tissue so that you can easily see if small pieces (or pests) come off the object and avoid any dirt being transferred to the next object.
Make sure you have everything you need for Marking and Labelling the objects including light and a magnifying glass if necessary.
Prepare yourself:
Make sure you have correctly identified which objects you are working with and have the correct numbers
Read the Museum’s Guidelines and Risk Assessments
Make sure your hair, clothing and jewellery cannot get entangled with the objects.
Wear suitable personal protective equipment: gloves, goggles if you need them, a vapour mask if you are sensitive to chemical vapours, an apron or lab coat, sensible shoes.
Plan your work programme so you have sufficient time to undertake all stages. It may be more efficient to treat several objects in batches, undertaking one stage at a time on all of them. It is vital that the objects do not get mixed up or lose their numbers at this stage.
USEFUL INFORMATION
Collections Trust: Labelling Guidelines and SPECTRUM
Health and Safety Executive: Control of Substances Hazardous to Health
White Spirit Manufacturers Safety Data Sheet (MSDS) Sample http://www.wickes.co.uk/content/ebiz/wickes/resources/images/coshh/191028.pdf
Acetone Manufacturers Safety Data Sheet (MSDS) Sample (Acetone is also called 2-propanone or dimethyl ketone)
http://www.reagent.co.uk/uploads/documents/ACETONE-TECHNICAL-MSDS.pdf
SUPPLIERS
Tyvek tape and labels, archival paper, Pigma pens, Paraloid resin
local art shops or https://www.cultpens.com/
white gel pens, fadeproof, waterproof black pens, artist’s brushes
chemists
Pure cotton wool or cotton wool buds
www.justgloves.co.uk or www.gompels.co.uk
nitrile, latex or polythene gloves
A starter kit for Marking and Labelling is available from SWMD at cost. Contact the CDO.
| Marking and Labelling – Positions and Procedures | ||||||||
| Adapted from the Guidelines developed by National Museums Merseyside, Liverpool | ||||||||
|
Object Type |
Where to mark |
Special notes |
Paraloid B72 + black/white pen + Paraloid B67 |
2B pencil |
Tie-on label |
Fadeproof waterproof pen on archival label |
Fadeproof waterproof pen |
Sewn-on label |
| Archaeology | ||||||||
| Metals – wet | Select a position according to object. | Use Tyvek not paper | x | |||||
| Wood – wet | Within polythene bag containing object. | Use Tyvek not paper | x | |||||
| Sherds (ceramic) | Undecorated surface not on fracture break. | x | ||||||
| Wood – dry | Select a position according to object. | x | ||||||
| Bone or ivory | Select a position according to object. | x | x | |||||
| Metals – dry | Select a position according to object. | If very friable, mark container. | x | |||||
| Art collections, frames, sculpture | ||||||||
| Frames for oil paintings,
textiles, prints, drawings & watercolours |
Gummed label attached to upper right corner of frame backboard overlapping gummed sealing tape if present.
Loan labels may also be attached to backboard. |
x | ||||||
| Framed prints, drawings,
watercolours |
Mark the stretcher and the frame on the top left-hand corner
at the back. |
x | ||||||
| Framed oil paintings | Mark the stretcher and the frame on the top left-hand corner
at the back. |
x | ||||||
|
Prints, drawings, watercolours, mounts |
On reverse, lower left corner. Leave 5mm gap from left + lower edges. Only mark paper over a hard, clean surface. Do not press hard, especially with soft paper. Don’t turn items over if pigments damaged or friable, especially
gouache and pastel. |
x |
||||||
| Sculpture, especially stone | Base or back. | x | ||||||
| Stone sculpture | Base, avoiding foot (reverse side if base inaccessible). | x | ||||||
| Oil paintings Unframed | On stretcher. Unframed panels are left unmarked. | x | x | |||||
|
Miniatures |
Upper right corner of backboard if present. Avoid overlapping frame seal. If no clear, separate backboard attach to storage enclosure/envelope only. |
x |
||||||
|
Object Type |
Where to mark |
Special notes |
Paraloid B72 + black/white pen + Paraloid B67 |
2B pencil |
Tie-on label |
Fadeproof waterproof pen on archival label |
Fadeproof waterproof pen |
Sewn-on label |
| Basketry | ||||||||
|
Basketry |
Tie around handle or loop through basketry if weave is open enough, otherwise write on inside edge or base. |
x | x | |||||
| Bird and mammal specimens | ||||||||
| Bird and mammal specimens (mounted) | Underside of base for mounted specimens, otherwise on a label attached to the horns, antlers or legs by thread. | x | x | |||||
| Bird eggs | Label in tray. | x | ||||||
| Bird skins | Label attached to dowel support and feet or to feet if no
dowel support. |
x | ||||||
| Fluid-preserved specimens | Inside container, against glass so they can be read from
outside, or self-adhesive label stuck on outside. |
Use Tyvek not paper | x | x | ||||
| Mammal skins Flat-mounted | On the card which supports the skins. | x | ||||||
| Bone and ivory | ||||||||
| Bone and ivory specimens
and artefacts (sound) |
On flat surface, under base or on back. | x | ||||||
| Ivory artefacts and specimens (with good surface) |
On flat surface, under base or on back. |
x | x | |||||
| Botanical collections: open | ||||||||
| Timbers | Printed labels attached direct to upper side. | x | ||||||
| Plant models | Original manufacturer’s labels adhered to upper
side of base. |
|||||||
|
Library |
Metal backed computer generated self- adhesive
labels *applied on base of spine, pencil annotation inside front cover. |
x | ||||||
| Botanical collections: boxed specimens | ||||||||
| Economic specimens | Self-adhesive labels *, outside of box, usually underside. |
Please ask for specialist advice |
x | |||||
| Lichens | Labels on acid free paper *, adhered with SCMC. | |||||||
| Macro fungi | Labels on acid free paper *, + pencilled tie-on tag round
stem for freeze-drying. |
|||||||
| Carpological (seeds) | Labels on acid free paper, adhered with SCMC to outside
of box. |
|||||||
| Exsiccate | Volumes placed within archive boxes; box spines labelled. | |||||||
| Prints & drawings | See ‘Art collections, frames, sculpture’ table. | x | ||||||
| Archives | Mark with pencil – see Paper, Photographs and Books | x | ||||||
|
Object Type |
Where to mark |
Special notes |
Paraloid B72 + black/white pen + Paraloid B67 |
2B pencil |
Tie-on label |
Fadeproof waterproof pen on archival label |
Fadeproof waterproof pen |
Sewn-on label |
| Ceramics and clay pipes | ||||||||
| Ceramic vessels and
ornaments |
Base, avoiding foot (reverse side if base inaccessible). | x | ||||||
| Clay pipes | Bowl bottom or, if broken, on pipe stem as well. | x | ||||||
| Coins and medals | ||||||||
|
Coins and medals |
Use a loose label |
Write the object number on an acid-free paper or Tyvek label using a suitable drawing ink and drawing pen. Put it underneath the object in its storage tray. Take a photograph of the object and mark the object number on the rear border of the print using a suitable drawing ink and drawing pen (record the weight of the object as an additional means of identification). Always keep the label with the object. When the object (and hence label) is moved, a proxy card should be put in its place. |
x |
|||||
| Furniture, wood, mirrors | ||||||||
|
Longcase clocks |
Trunk, hinge jamb near top, inside door in same position. | x | ||||||
| Hood, on mask on hinge side near top (hidden when door
closed), inside door in same position. |
x | |||||||
| Bracket/pediment clocks | Back, top right corner. | x | ||||||
|
Free standing clocks |
Clocks with feet, inside right back foot if it can be seen without lifting clock. If not on back, near base, right. | x | ||||||
| Tables, cabinets, commodes | Back at top right corner (upper section if present) or back
lower right corner. |
x | ||||||
| Chairs | Back seat rail, centre of inside face. | x | ||||||
| Drop-in seats | Back rail, centre of front face. | x | ||||||
| Drawers | Back, outside face of backboard, right. | x | ||||||
| Lids | Jamb or lip, inside, right. | x | ||||||
| Mirrors | If freestanding, reverse side; side of mount if wall mounted. | x | ||||||
| Wooden objects,
miscellaneous |
Mark unpainted wood, underside, back or inside edge. | x | ||||||
|
Boxes |
Small: On base, right back corner. | x | ||||||
| Large: Hinge jamb of lid and body, right corner. | x | |||||||
| Object Type | Where to mark | Special notes | Paraloid B72 + black/white pen + Paraloid B67 |
2B pencil |
Tie-on label | Fadeproof
waterproof pen on archival label |
Fadeproof waterproof pen | Sewn-on label |
| Leather | ||||||||
| Leather objects with smooth
firm surface (not books) |
Underside or back. | x | ||||||
| Leather, soft suede or napped, and un-tanned or
semi-tanned skin |
Loop through existing hole or mark container/packaging. |
x | ||||||
| Minerals and fossils | ||||||||
| Minerals, rocks and fossils | Matrix (or the ‘poorest side’ of specimens without matrix). | x | x | |||||
|
Crystals |
With number on label inside glass tube, painted number on
outside of glass tube or plastic box, or label on specimen matrix or base. |
x | ||||||
| Sub fossil bone/shells | On underside or matrix, or painted no. on outside of tube or
plastic container. |
x | x | |||||
| Musical instruments, toys and dolls | ||||||||
| Musical instruments | On back of case or frame, underside of object, bare metal
part if possible. |
Do not use Paraloid on lacquered metal | x | x | ||||
|
Toys and dolls |
Back of shoulder plate/back of doll: underside/back of toy.
Mark clothes as for costume. |
Paraloid B72 + black or white drawing ink + Paraloid B67 and Tie-on label, or sewn on label if
appropriate. |
x | x | x | |||
| Paper, photographs and books | ||||||||
| Archives – single sheets,
ephemera |
Reverse, lower left corner in margin area if possible | x | ||||||
|
Books, albums, sketchbooks |
Lower corner on inside of each cover; if decorated, on first
plain page. Use book supports where possible, avoid pressure on joints. |
x | ||||||
|
Photographs (all types: prints, negatives, glass slides) |
Mark enclosure (without photo inside/underneath) rather
than photo. |
Method depends on nature of enclosure. Consult a paper or photograph conservator if in doubt. |
x | |||||
| If framed, see Frames in ‘Art collections, frames, sculpture’. | ||||||||
| If small cased photographs, see Miniatures in ‘Art
collections, frames, sculpture’. |
||||||||
| Glass, crizzled (for miniatures and cased photographs (Consult a conservator asap) |
A small sound area, or mark container. Avoid consolidating glass. |
x | ||||||
| Plastic, wax and lacquer | ||||||||
| Plastic objects (not
photographs) |
Under base, or back, depending on object. | x | x | |||||
|
Wax objects |
Depends on object. |
Use Tie-on label or mark container DO NOT USE Paraloid solutions as they will dissolve the wax. | x | |||||
| Lacquer, Oriental and
European |
Mark only on un-lacquered surface or use Tie-on label. | x | ||||||
| Shells and insects | ||||||||
| Shells, conchology collections | Label in tray. | Tie-on label. | x | |||||
| Insect collections | On card, mounted on the pin. | Pencil or ink. | x | x | ||||
|
Object Type |
Where to mark |
Special notes |
Paraloid B72 + black/white pen + Paraloid B67 |
2B pencil |
Tie-on label |
Fadeproof waterproof pen on archival label |
Fadeproof waterproof pen |
Sewn-on label |
| Textiles and other costume | ||||||||
| Costume | Back of neckband or waistband, near the opening. | x | x | |||||
| Shoes | On the sole, under the instep. | x | x | |||||
| Bags and purses | Inside, near the opening. | x | x | |||||
| Gloves and stockings | Inside the welt or cuff. | x | ||||||
|
Curtains, tapestries, banners and draperies |
If hanging: On reverse side, usually lower right-hand corner. |
Sewn-on label, 25mm width for larger textiles. |
x | |||||
| If rolled add labels which can be seen without unrolling. | x | |||||||
| Rugs, tapestries and carpets | Reverse side, on two diagonally opposite corners if large. | Sewn-on label, 25 mm width if large. | x | |||||
| Textile fragments | Loop through existing hole, on folder or box for very fragile
pieces. |
Tyvek label on fine loop of thread, pencil on card,
or marker pen on box. |
x | x | x | |||
| Textiles and embroideries | On the reverse at the corner. | x | x | |||||
| Tools, machinery, vehicles, boats | ||||||||
| Tools | Near the handle junction, on metal part if there is one. | x | ||||||
| Ship models | Discretely, or on crate or case. | x | ||||||
| Ships and boats | Bow, bottom of stem. | x | ||||||
| Machinery and equipment | Right hand side, low down. | x | x | |||||
| Land Transport, vehicles | Inside driver-side door/right hand side. | Can use acrylic paint on Paraloid layer for large
vehicles |
x | |||||
| Weapons, armour and powder horns | ||||||||
| Edged weapons (swords and bayonets) | Blade, below hilt and ricasso. Scabbard, back of top mount. | x | ||||||
| Long arms and handguns (rifles, muskets, pistols,
revolvers) |
Preferably on trigger guard mount, or other metal part rather than wood. | x | ||||||
| Ordnance | On base, on bare metal. | x | ||||||
| Pole weapons (halberds, lances, pikes, clubs, maces,
spears) |
Preferably on bare metal. |
x | ||||||
| Armour, helmets | Inside rim if bare metal, or tie-on label. | x | ||||||
| Powder horns and flasks | Back edge near opening, or under base. | x | ||||||
BASIC TECHNIQUES
- Ink on lacquer base coat with a protective lacquer topcoat – Paraloid B72 + black or white pen + Paraloid B72 or Paraloid B67
This technique can be used on most materials, providing the object has a stable, smooth, and undecorated surface. Generally, glass, metal, stone, ceramics, bone and shell are some suitable materials. Plastics, painted or lacquered surfaces and varnished objects (including furniture) are not suitable as their surfaces may be dissolved by acetone. Textiles and paper are not suitable as the lacquer will sink into the fibres. Test this method on similar materials to gain confidence.
The acrylic resins chosen have been tested for their stability and suitability for use with objects.The same resin solution can be used for the base coat and top coat. However, some people have found they have problems with the top coat disturbing the written number when it is applied. In this case a different acrylic resin, which dissolves in white spirit, can be used as the top coat.
Base coat: Paraloid B72 20% solution in acetone (20g in 100 ml acetone) Top coat: Paraloid B67 20% solution in white spirit (20g in 100 ml white spirit)
Equipment:
- Wear suitable protective clothing such as an apron or lab coat, solvent resistant gloves, an organic vapour mask if working for long periods
- Use the lid to keep all the tools and materials away from the object
- A bottle of Paraloid B72 solution in
- A bottle of Paraloid B67 solution in white spirit.
- A bottle of acetone.
- A bottle of white spirit.
- A very small container of water, preferably with a lid (to minimise the chance of spills)
- Cotton wool buds
- Paper towels (in case of spills)
- Fadeproof, waterproof black and white pens (the kit contains Rotring Tikky black pens and a white gel pen)
- A safe method of disposal of cotton wool buds dipped in solvent (e.g. small polythene bag or solvent-proof container)
Method:
Read relevant risk assessments and safe working practice documents
Prepare your work area. The space must be safe, clean and dry with enough room to work and to lay out the objects whilst drying
Decide the most appropriate location for the number
Prepare this area by lightly wiping the surface with a cotton wool bud partially dipped in acetone to remove any dirt and grease. Don’t saturate the cotton wool with acetone or it will run over the surface and may cause damage.
Several objects can be treated this way in batches, provided you can identify the cleaned area.
If the acetone removes anything other than dirt, stop and contact a conservator. The object may not be suitable for marking by this method.
Using the brush in the bottle cap, paint a small area of the object with a base coat of the Paraloid B72 solution. This should be done in a single brush stroke, just large enough to write the number on.
Wait until the base coat is dry. This may take 15-30 minutes depending on the conditions. In cold or damp weather, or on a non-porous object, the lacquer will take longer to harden. Examine the surface. If it looks shiny there is enough Paraloid on the surface to provide a safe writing surface. If the area looks dull, the Paraloid may have sunk into pores in the surface. Apply a second stroke of Paraloid B72 in acetone on the same area. Allow to dry.
Write the accession number on the base coat using the Rotring Tikky fadeproof, waterproof pen or the white gel pen. Use black ink on most objects, or white ink for dark objects on which black lettering would not show clearly. If you make a mistake or the number is not easily readable, use a cotton wool bud lightly moistened with water to remove the ink before it dries. Allow the basecoat area to dry and rewrite the number.
Wait until the ink is dry (at least 15-30 minutes depending on conditions)
Apply a layer of Paraloid B72 in acetone as a varnish on top of the number. Try to apply it quickly and lightly as one stroke, with the brush hardly touching the surface. Allow the topcoat to dry completely before re-packing the object.
To remove the lacquer and ink at any stage of this process, gently roll a cotton bud lightly dipped in acetone over the area, working from the edges to the centre. Change the cotton wool regularly to avoid spreading ink and Paraloid resin across the surface. Dispose of the waste safely in a plastic bag, in a bin outside the museum.
NOTE: If you have problems with the ink running when the top coat is applied, remove the spoiled lacquer with a swab dipped in acetone as describe. Apply the base coat and allow longer for it to dry. Allow the ink a longer time to dry as well. When it is definitely dry (gently press a small piece of white paper towel on it if you are not sure) you can use the Paraloid B67 in white spirit solution to apply one single stroke of lacquer as a topcoat.
2. Printed label attached with lacquer
This can be very helpful when you have a large number of objects to label with similar or consecutive numbers, when you cannot write very small numbers easily or when the object has a very curved or uneven surface that is difficult to write on.
Equipment: As for Technique 1.
Prepare a label printed on archival quality paper using only BLACK ink to minimise fading. If necessary, write on any further numbers with the Rotring Tikky pen or Pigma Micron pen.
Decide the most appropriate location for the number. Prepare this area by lightly wiping the surface with a cotton wool bud dipped in acetone to remove any dirt and grease. Several objects can be treated this way in batches, provided you can identify the cleaned area. If the acetone removes anything other than dirt, stop and contact a conservator. The object may not be suitable for marking by this method.
Using the brush in the bottle cap, paint a small area of the object with a base coat of the Paraloid B72 solution. This should be done in a single brush stroke, just large enough to place the label on. Allow it to dry and apply a second brushstroke of the Paraloid B72 solution over the first.
While the lacquer is still sticky, place the label on and gently press in place. Allow the lacquer to dry.
Apply a single application of the top coat over the label to protect the printing. You should be able to use the Paraloid B72 solution as the topcoat. If you have any problems, you can use the Paraloid B67 solution as the topcoat.
3. Sew-on label
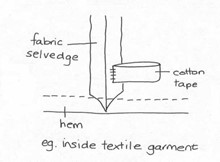
The accession number is written or sewn on a fabric label and sewn onto the object in an appropriate place. This technique is commonly used for textiles as it causes significantly less damage than marking the object, and it is easily reversible. The positioning of the label must be carefully considered so as not to cause damage. Choose a robust area of fabric where extra weight will not put the fibres under tension and where the attaching stitches will not be visible from the front, such as shoulder seams or hems.
Equipment:
- Cotton tape
- Fine needles (curved needles are included)
- Scissors
- Fadeproof, waterproof black marker pen, e.g. Rotring Tikky or Pigma pens
- Fine cotton thread
Method:
Prepare your work area, away from the objects. The space must be safe, clean and dry with enough room to work and to lay out the labels whilst drying. Never use pens on the same table as the objects or leave the pen nearby. This could result in accidental permanent marking of the textile.
Examine the object to check if this method is appropriate. If in doubt, put the object to one side and consult a conservator
Decide the most appropriate location for the number, considering the stability of the textile. The inside of a seam is often suitable.
Stretch out a length of cotton or Tyvek tape on a clear smooth surface. You may find it helps to wrap it around a small piece of cardboard.
Write the Object Number onto the tape using the fadeproof, waterproof pen. Leave enough space for cutting and turning in the ends of the tape. If you have a sewing machine which can embroider letters and numbers, this can be used to write on the tape.
Attach the tape by one of the following methods:
Looped label method
Turn in the cut ends, loop the tape around so the folded ends meet. Stitch the ends together (sew down this hem when attaching to the object)
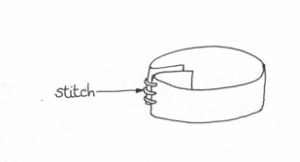
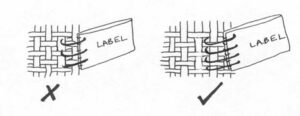
Sew between the threads of the object NOT through them:
Hemmed flat label
Turn in the cut ends (sew down both folded ends when attaching to the object)
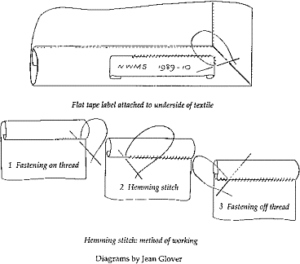
Sew the label quite loosely, but securely onto the textile using a fine needle, compatible thread and a fine, neat stitch. The most appropriate method will depend on the type of garment. Take care to pass the needle between threads and not through them, and to ensure that the stitches do not pucker the fabric
Tie off the thread securely on the label but avoid pulling the stitches.
4. Tie-on label
Used when it is inappropriate for the object to be marked directly. Consider whether the object is structurally sound enough to attach a label, or whether this would damage weak areas.
Equipment:
- Tyvek or archival paper labels with a hole to thread the tie through
- Fadeproof waterproof marker – Rotring Tikky or Pigma pen,
- Cotton tape or soft twine
- Scissors
(Tyvek is a non-woven, breathable polymer which can be formed as a thin fabric, paper or card). It is waterproof, rot-proof, light, very strong and has many uses with museum objects)
Method:
Decide the most appropriate location for the number Make a hole in the label if it does not have one already.
Write the object number on the label, on both sides, using the fadeproof, waterproof Rotring Tikky or Pigma black pen.
Cut a length of cotton tape or soft twine long enough to go around the object and tie. Pass the tape through the hole in the label and knot it once.
Place the tape around the object in the chosen location
Tie the tape with a loose knot, ensuring the tape is not too tight
5. Marking with a 2B pencil
The accession number is written directly on the object. Paper is easily marked with a 2B pencil, which can be easily removed using a very soft, clean white eraser. Modern photographs printed on plastic-coated paper may need a 4B or 6B pencil. If marking on the reverse, think about the area on the front – will the pencil mark show through if the paper is thin?
Method:
Prepare your work area. The work surface should be smooth and hard, not padded, so that when you write on the paper the pencil will not indent. Lay one or two sheets of acid-free tissue down to provide a clean, dry surface.
Decide the most appropriate location for the number – usually on the reverse. Take into account the condition of the paper. Never write in the middle of the object. Because pencil can be easily erased, consider writing the number in two separate but standard locations (e.g. inside front cover, inside back cover of books)
Make sure the pencil tip is not too sharp – rub it a few times on scrap paper to round the end.
Gently write the accession number on the object
If you make a mistake, use a very soft, clean eraser. Hold the paper steady with one hand and gently stroke the eraser in one direction only, across the pencil number to erase it. Do not rub it to and fro. Be especially careful of weak areas or torn edges
Never write on a stack of objects as pressure can transfer pigment/ink to surface below.
6. Loose label for special objects
When an object is too small or detailed, too fragile or too porous to be marked or to have a label tied on, the label should be attached to the support or mount or kept in the packaging with the object.
Equipment:
- Archival quality paper or Tyvek labels
- Fadeproof waterproof marker – Rotring Tikky or Pigma pen,
- Cotton tape, cotton thread, fine needles Method:
Write the accession number on archival paper or a Tyvek label using the Rotring Tikky or Pigma pen. If you wish to print the label you must use a waterproof ink cartridge.
Attach the label to the mount or support, by stitching in position using cotton thread and a fine needle, by tying with cotton tape or soft twine.
OR
If the object is packed in an individual small box or ziplock bag, the label can be placed inside. Ensure the label cannot move around and damage the object. The information should also be written on the outside of the box, as well as in the relevant documentation. Avoid placing objects in sealed ziplock bags as moisture can build up. Pierce the bag with a few pin pricks before placing the object and label inside and storing in a suitable box.
7. Labelling wet objects
Wet objects such as archaeological finds should have been numbered during excavation. If not, write the number and other relevant information on a Tyvek label using the Rotring Tikky or Pigma fadeproof, waterproof pen, allow it to dry thoroughly and place it in the container with the object. Write the number on the outside of the container with the Polyester marking pen.
Wet biological specimens should only be opened and a number inserted by someone trained to work with the solutions used. In emergency, use the Paraloid/ink/Paraloid method or attach a printed label to the jar with Paraloid B72 solution, avoiding any area of decoration or writing. Do not attempt to open the jar.
8. Pinned label for biological specimens
Biological specimens, such as pinned insects, can be very brittle when in dry conditions. Avoid shock and vibration when handling. If the specimen is strong enough to move, and if it can be safely removed from its stand using fine tweezers to grip the pin, a small label can be placed on the pin using the following method:
Method:
Decide the most appropriate location for the number
Write or print a very small label using the Rotring Tikky or Pigma fadeproof, waterproof pen on archival paper or a piece of a Tyvek label.
Make a hole in the label with a pin about the same size as the pin used on the specimen. Do not use the pin on which the specimen is mounted as this will cause severe shock.
Place the label on a small piece of Plastazote foam. Carefully pick up the specimen by the shaft of its pin, using fine tweezers or needle-nosed pliers. Insert the tip of the pin gently through the hole in the label.
Reattach the pin with the specimen (and label) in its original stand.
9. Some alternatives for larger items
Even large items should be treated according to the same principles as small or delicate items. Archival quality materials must be used, with a method that does not permanently alter the object.
Vehicles and large items can have the number written in artist’s acrylic paint so that it is large enough to be read from an appropriate distance. The underlying surface should be protected with Paraloid B72 and the number protected with a topcoat as in Technique 1. If the surface is sensitive to acetone, a different method must be used.
Engraved plastic or metal tags can sometimes be used, attached to existing holes in the object. Take care to protect the object from contact with a different metal as this could direct contact with any metal as this could lead to enhanced corrosion. Protect the area with Paraloid B72 lacquer first. Polypropylene ties can sometimes be used, but care must be taken that they do not indent the surface of the object.
Large, wrapped items can have a label with a photograph of the object printed on archival paper, kept in a polyester sleeve or small ziplock bagged, attached to the outside of the wrapping, to avoid unnecessary handling.
Download the resource: